Class hours: 9:40 – 2:05
Mr. Bohmann
wbohmann@ewsd.org
Today’s Notes
- Today is an EHS A Day
- CAWD Sweatshirt Sizes & TShirt Sizes
- Foliage Photo – Pick your favorite for printing, I’ll be coming around
- YRBS Survey tomorrow
- Fire Drill Procedures
- Portrait or Head shot. Bring to class (digitally of course). Must be at least 640 x 480 px
- My HTML basics CodePen. You should fork it so you have your own reference.

9:40 Attendance
9:45 The Head Tag
The <head> tag of your document is a busy place. Lots of great information can be housed there which provides essential information for the browser (IE, Safari, Firefox, Chrome, Opera)
This information is essential so that indexing browser bots and spiders can cache keywords, character type, viewport information, meta data and links to your style sheets. Here is a snippet that you can copy. Go to my repository (called a repo) on GitHub. If you create your own GitHub account you can fork this and have a snippet for yourself.
Below is a sample of what might go in the <head> element.
<!DOCTYPE html>
<html lang="en" dir="ltr"> <!--Means language, English, Direction, Left to Right -->

<head>
     <meta charset="UTF-8">
     <title>Title of your Page Here</title>
     <meta name="description" content="What is your site about">
     <meta name="keywords" content="what are keywords in your site">
     <meta name="author" content="who owns or authors this page">
     <meta name="viewport" content="width=device-width,initial-scale=1.0">
</head>

<!-- The viewport is the user's visible area of a web page. It varies with the device, and will be smaller on a mobile phone than on a computer screen.

The width=device-width part sets the width of the page to follow the screen-width of the device (which will vary depending on the device).
The initial-scale=1.0 part sets the initial zoom level when the page is first loaded by the browser. -->

</html>
Head Tag Slides for Reference
Activity: EB Elxers
- Create a Folder on your desktop. Call it WebPractice
- Open Atom
- Create a new document and <head> tag for the Company I’m showing on the screen
- Be sure to include all of the correct meta data to help out with Search Engine Optimization
- In the <body> create a list of flavors
- save the file as index.html
- FTP the folder and index.html file to your webserver. We have our first website!
If there is time left before break we are going to create some custom code snippets in Atom.
10:35 Mask Break

10:45 English with Ms. Yopp

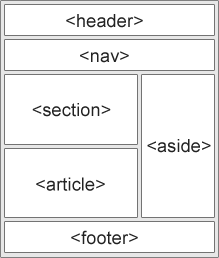
11:35 HTML 5 Layout Elements
Websites often display content in multiple columns (like a magazine or newspaper).
HTML5 offers several semantic elements that define different parts of a webpage:

<header> Defines the header for a document or section
<nav> Defines a container for navigation links
<section> Defines a section in a document
<article> Defines an independent self-contained article
<aside> Defines content aside from the main content (like a sidebar)
<footer> Defines a footer for a document or section (usually at the bottom of the page)
Why the <section> and <article> are useful HTML Elements
Before HTML5, web developers created a <div> to organize items on a webpage.
A <div> could have an ID or a class. ID’s can be used once. Classes can be used more than once. IDs and classes are helpful “handles” for CSS styling.
So, to minimize lots of divs and “divitis”, The <section> and <article> elements were added in HTML5. You don’t have to use them, however they are very useful.
The <section> element defines sections in a document, such as chapters, headers, footers, or any other sections of the document.
Your resume could be divided into sections as an example (Objective, Education, Work Experience, References, Awards)
Here is an example Vermont Road and Home of the sections element in use from a page I built years ago. Use the inspector to see how each part of the page is divided into sections and how the sections are set up as IDs that aid in navigation.
The <article> element is a specialized kind of <section> in that it is independent, self contained block of related content.
The weather widget below is self contained and is just one kind of example of an <article>. In this case, one article houses a bunch of other articles. Tip, don’t think of the <article> element as a literal article.
Weather forecast for Burlington
November 2nd
Cloudy
November 3rd
Cloudy with a chance of meatballs
November 4th
Heavy Meatballs
<article class="forecast">
 <h1>Weather forecast for Burlington</h1>
 <article class="day-forecast">
 <h2>November 10th</h2>
 <p>Cloudy</p>
 </article>
 <article class="day-forecast">
 <h2>November 11th</h2>
 <p>Cloudy with a chance of meatballs</p>
 </article>
 <article class="day-forecast">
 <h2>November 12th</h2>
 <p>Heavy meatballs</p>
 </article>
</article>
Project #1 Your HTML 5 Resume
Create a New Folder on your Desktop. Name it WebPortfolio
Create a new html document. Name it resume.html
Using the markup from yesterday’s exercise, translate that into an updated HTML5 resume. You may have done something similar to this last year, however now you are using updated and improved content. Don’t worry about styling. Just get a digital markup of your most recent resume.
The process should be pretty easy considering you have a mostly final version completed. This resume will be part of your senior portfolio we will be building as a class. Use your current resume as your reference.
You should use exactly zero styling. This exercise is all about using raw HTML. We will make it look pretty later with CSS.
Commenting is good practice. Comment out each section with a section start and end. Just for practice.
Remember your markup should be structured semantically using proper tags and indentation levels.
FTP your WebPortfolio folder with your resume.html to the our server.
Did you check the HTML Validation service? You should!
This assignment is due by Friday, November 5th.
Tips:
- Create a header with a big ol’ h1 stating your name
- Add an address tag with your address
- Add an anchor tag with your email and an href with mailto:your@email.here
- Create and use the section element for each section of your resume (Goals, Work Experience, Skills)
- Deploy the best heading elements that match your resume, bulleted lists, bold, italics, etc…
- Add a footer to the bottom of your resumePut similar information in the footer as you did the header only make it smaller by using tags that print normal sized text.Don’t forget to make your email link clickable with a href=”mailto:…”
12:15 Lunch

12:45 <Aside>
The <aside> element can be used as a compliment to information found on a webpage, but perhaps the content might be better as a standalone option.
Let’s do one together and we’ll add some CSS for fun.
Here’s some content for us to use:
Salamanders
Salamanders are a group of amphibians with a lizard-like appearance, including short legs and a tail in both larval and adult forms.
Did you know?
The Rough-skinned Newt defends itself with a deadly neurotoxin. This is not the type of toxin you want to have a run-in with. Try not to agitate.
Several species of salamander inhabit the temperate rainforest of the Pacific Northwest, including the Ensatina, the Northwestern Salamander and the Rough-skinned Newt. Most salamanders are nocturnal, and hunt for insects, worms and other small creatures.
An adult salamander generally resembles a small lizard, having a basal tetrapod body form with a cylindrical trunk, four limbs, and a long tail. Except in the family Salamandridae, the head, body, and tail have a number of vertical depressions in the surface which run from the mid-dorsal region to the ventral area and are known as costal grooves. Their function seems to be to help keep the skin moist by channeling water over the surface of the body.
Mr. B. did you say “Extra fun” – Show us the <details> and <summary> elements…
1:10 Mask Break

1:20 Production time and Guided Support
HTML5 Resume – see above (no styling)
CAWD 2 Sweatshirt Design