Class hours: 9:40 – 2:05
Mr. Bohmann
wbohmann@ewsd.org
Today’s Notes
- Today is an EHS A Day
- PE Class starts at 1:15 and will meet at the weight room
- EHS Students come to Cawd today & Friday. At 10:45 let’s set up the following:
- Photoshop Open with Old Photo Image loaded from Public Folders/Cawd2/EHS_Advisory
- Blender Open with Default Cube
- CAWD Website – Front Page open
- Lunch is early today – 10:50 – 11:25 – you will not be in the room 🙁
- Portfolio Rubric – Please hand in your Rubric to me – make sure your name is on it and you’ve evaluated yourself. I will be grading today after school.
- Books – if you know you are going to finish your book, plan to get another before reading time begins. When you finish a book, send me the Author and Title. For Books over 200 pages, I will post the book cover on our wall. Graphic Novels should be one part of your reading practice but not all.
9:40 Attendance
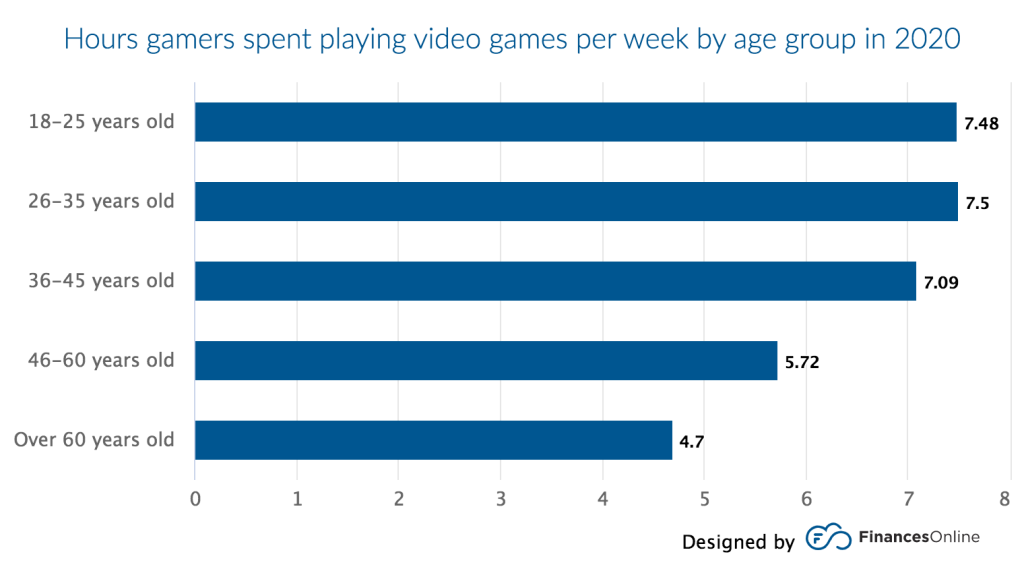
9:45 Graph of the Week

10:00 Control Panel Project cont…
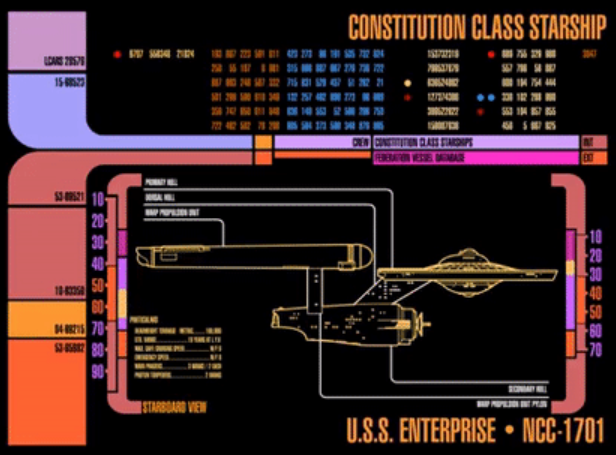
Work on Modeling and design if you are complete with your Concept Art. Remember, I must see your concept art before you begin the modeling process.
Part One:
Pre-Production: Using one, two or three point perspective illustration skills, create a prototype / concept art of your very own control panel. The more detail you add, the better. As you may not always be the modeler. This is the job of the concept artist. You must have your concept art approved by me first before opening Blender.
Give your control panel a unique name (ex. litespeed2000)
Part Two:
Modeling: Unleash your creative skills and create your very own control panel in Blender from your concept art.
Your deliverable will include at least 5 blinking / moving elements. (could be blinking lights, sliders, knobs, levers….) using keyframing. Animations limited to 10 seconds max.
Showcase on Friday afternoon. Filename:ControlPanel
Render Requirements to be posted on Friday Dayplan.
10:35 Mask Break
10:45 – 11:25 Early Lunch

11:30 – 12:45 Lighting & Lightbox
Lighting in and of itself is really a skill and an art form. When working outside with our cameras we had little control over lighting but had a lot of control on where we move ourselves or our subject.
Studio photography provides an opportunity to set up lighting for different types of effects, mood and composition.
In a modeling program like Blender, we can design all kinds of light set ups and we can even have our subjects emit light. Plus, all of lighting choices can change with a bit of keyframing.
Three Point Lighting is not a concept we were able to tackle in photography. However, we can easily understand and see how it works in Blender.
The important thing to remember in Blender is anything can be a light!
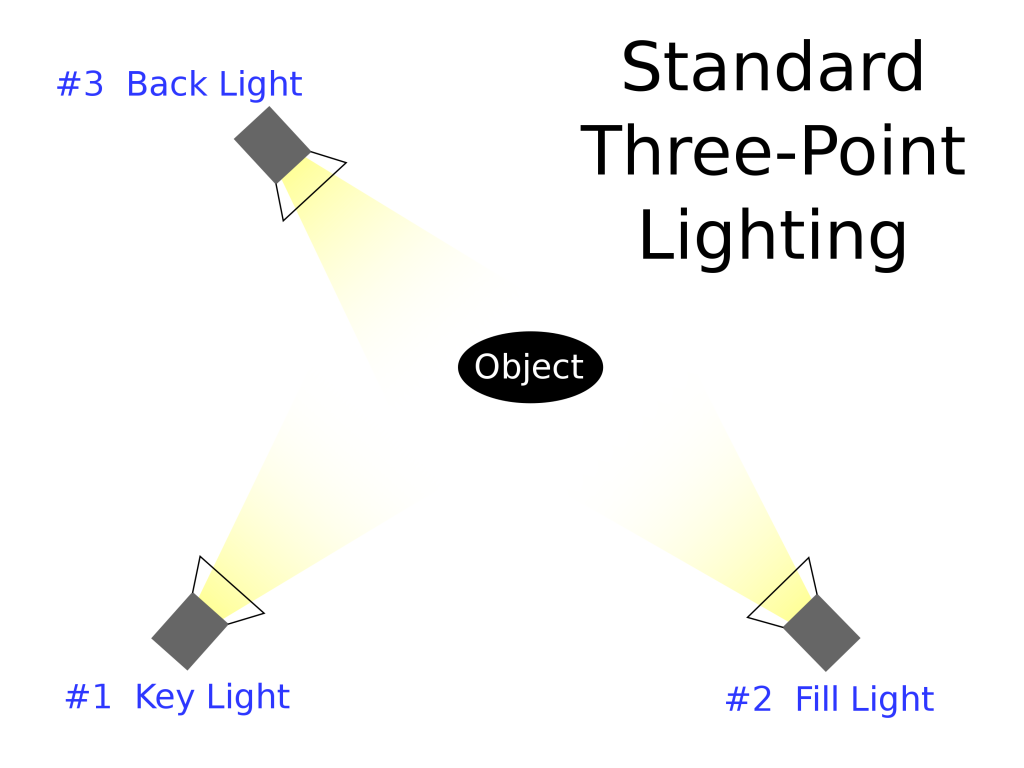
Three Point Lighting is a technique that includes three types of light positions.
- Key Light – which servers as your principal illuminator and is usually your strongest light
- Fill Light – which is often placed lower than the key light to balance out the shaded surfaces
- Back Light – whose primary purpose is to top or back light the subject and provide a rim of light
Position of lights can provide mood (shadows on subject, lighting from below, silhouettes, etc…). Lighting is an art – and experimentation is important to setting up a good render.
Activity #1: Setting up Three Point lighting and using Emissive Meshes
Activity #2: Creating a Lightbox with Emissive Materials
12:45 – 1:05 Focus on Literacy

1:05 Mask Break

1:20 Production Time and Guided Support
We have one project at the moment:
- Control Panel – Due Friday
Website – For everyone that presented already, your portfolio is due (all deliverables) by the end of the day.
Ask questions, get help. Work backwards if you did not get a chance to practice 1, 2 or 3 point perspective drawings.