Class hours: 9:40 – 2:05
Mr. Bohmann
wbohmann@ewsd.org
Week Twenty One
Today’s Notes
- Visitors – we some this week:
- Today is an EHS A Day
- Explore CTE – EHS HS students 10:45 – 11:20 Tues
- Same routine as before | Firefox | Visitor Form | www.bramblevt.com | clean desk
- Skills USA Pins – Presentations of the top 10 will be on Wednesday, Feb. 1.
- Congratulations to Ryan – a finalist! Two from CAWD 1
- 20% and Ball Bounce at 10am
9:40 Attendance & Monday Mailbag
10:00 20% and Ball Bounce Presentations
If there is some time left…. In Blender create a character that is only a body. Example, flour sack, pizza slice, potato, radish (vegetables are good examples). Make a shape only. Do not add any arms and feet right now. This is an extension of the box modeling exercise we did last week.
Save.
10:35 Break

10:45 English with Mx. Yopp

11:30 Let’s Rig!
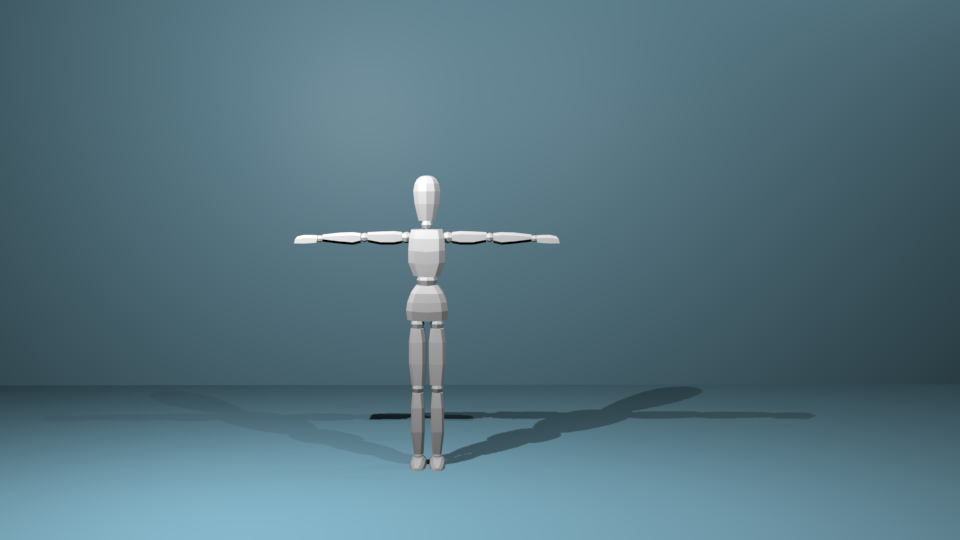
Today we’ll tackle armatures and put together a basic rig. We’ll start with the character above, which should be a simple character we can deform with an armature. This model is in a T Pose. This is a classic standard model pose. When modeling your own, consider your standard vanilla pose as the T-Pose.
We’ll use some simple naming and use symmetrize to quickly build out our rig. We’ll also look at weight painting, posing and copy posing to animate the our character.
We can also go further and use Blender’s new Action Editor to create and store a series of poses.
All of the skills used today will help you with other rigging tasks. I’m amazed at the amount of control and options in Blender.
Pose Mode is Blender’s special mode for animation. You can enable it by adding an armature. Pose Mode unlocks a host of tools for animation.
Weight Painting is used for rigging meshes, where the vertex groups are used to
define the relative bone influences on the mesh. When we turn on weight painting we can see the influence per bone and paint on or off influence
Forward Kinematics – is the concept of manipulating each bone individually
Inverse Kinematics – the last bone controls the ones above in hierarchy. We’ll tackle this part today. Setting up various controls and looking at how to use the controls to move and animate your project.
Let’s all start with the same file together. You can download it here
Activity after rigging: Create a pose library
- T-pose
- neutral stance
- crouch
- jump
- kick
- dead
Save your rig as TposePractice_Lastname
You do not need to turn in.
12:15 Lunch

12:45 Literacy in Practice

1:10 Break
1:20 20% Production Time & Guided Support
- Past Due work
- T Model Practice
- 20%