Class hours: 9:40 – 2:05
Mr. Bohmann
wbohmann@ewsd.org
Week Thirty Three
Today’s Notes
- Today is an EHS A Day
- WorkKeys – May 17th and May 24
- No School if you are not on the list
- If you are on the list, and you are EHS student, you will also go to EHS classes
- Ryan has been selected to receive one of the five PSA contest awards that VHSA will hand out this Saturday, May 13th
- HAPPY BIRTHDAY GARRETT!
- Test Prep Practice – 80% Accuracy today
9:45 Lighting in Unity
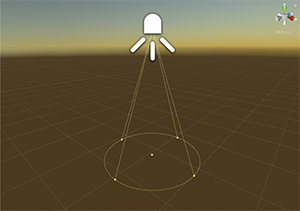
Lighting is a nice way to give your level, scene, interaction some more personality. There are several light types, let’s explore a few.
Let’s Create a New Scene together, add a FPC and a small 3 sided room with ProBuilder Tools
Directional Light is most like the Sun. You can change direction and rotation but it is always shining and illuminates everything in one direction only
Point and Spot lights control the location, direction and rotation of lights. Let’s look at each.
Point Lights emits light in all directions
Spot Lights include a falloff value and emits light in a cone shape
Area Lights are defined by a rectangle or disc shape and emits light in all directions uniformly from its surface but only from one side of the mesh. Area Lights require baking to be able to view.
We can also make lights out of gameObject by making them emissive. An emissive material will emit light on to other game objects if (and only if) those game objects are static. To make an emissive material work, we have to bake (render the lightmaps) to the scene. Let’s try.
Volumes are a great way to add nice effects to your scene. We can create post processing effects globally or locally. In order to render the post-processing effects, we’ll need to enable post processing on our camera. Then we’ll create some volumen effects either locally or globally depending on what your scene demands. Let’s look at some features. there too.
Level Up: On the assignment that you are handing in tomorrow (using Unity ProBuilder to design a level) add some unique lighting to go with your level design and materials.
Work Time – complete your level design in Unity with the addition of Lighting
Light Flicker Code
using UnityEngine;
using System.Collections.Generic;

// Written by Steve Streeting 2017
// License: CC0 Public Domain http://creativecommons.org/publicdomain/zero/1.0/

/// <summary>
/// Component which will flicker a linked light while active by changing its
/// intensity between the min and max values given. The flickering can be
/// sharp or smoothed depending on the value of the smoothing parameter.
///
/// Just activate / deactivate this component as usual to pause / resume flicker
/// </summary>
public class LightFlickerEffect : MonoBehaviour
{
    [Tooltip("External light to flicker; you can leave this null if you attach script to a light")]
    public Light light;
    [Tooltip("Minimum random light intensity")]
    public float minIntensity = 0f;
    [Tooltip("Maximum random light intensity")]
    public float maxIntensity = 1f;
    [Tooltip("How much to smooth out the randomness; lower values = sparks, higher = lantern")]
    [Range(1, 50)]
    public int smoothing = 5;

    // Continuous average calculation via FIFO queue
    // Saves us iterating every time we update, we just change by the delta
    Queue<float> smoothQueue;
    float lastSum = 0;


    /// <summary>
    /// Reset the randomness and start again. You usually don't need to call
    /// this, deactivating/reactivating is usually fine but if you want a strict
    /// restart you can do.
    /// </summary>
    public void Reset()
    {
        smoothQueue.Clear();
        lastSum = 0;
    }

    void Start()
    {
        smoothQueue = new Queue<float>(smoothing);
        // External or internal light?
        if (light == null)
        {
            light = GetComponent<Light>();
        }
    }

    void Update()
    {
        if (light == null)
            return;

        // pop off an item if too big
        while (smoothQueue.Count >= smoothing)
        {
            lastSum -= smoothQueue.Dequeue();
        }

        // Generate random new item, calculate new average
        float newVal = Random.Range(minIntensity, maxIntensity);
        smoothQueue.Enqueue(newVal);
        lastSum += newVal;

        // Calculate new smoothed average
        light.intensity = lastSum / (float)smoothQueue.Count;
    }

}
10:35 Break


CAWD Fun Games – Game Studio
10:45am CAWD Final Project – Work Session
| Date | Week | Deliverable | Software Development Cycle |
|---|---|---|---|
| May 10th – 12th | One | Project Intro, Game idea generation, pre-planning | Planning |
| May 15th – 19th | Two | Game Design Document, Asset creation / Coding | Analysis / Design |
| May 22nd – May 26th | Three | GUI, Movement, Core Mechanics | Design / Implementation |
| May 3th – Jun 2nd | Four | Prototype with game play | Testing/Maintenance / Publishing |
| June 7th -8th | Game Jam |
Game Design Documents are due Monday.
This Week Deliverables:
- Are you on a team or working solo – email me with details by lunch on Friday
- Trello board shared with me (one Trello board per game)
- Game Design Document – rough draft (due by Monday)
12:15 Lunch

12:45 Independent Reading

1:10 Break
1:20 Independent Project Worktime of Individual Support
- Level Design Using Unity ProBuilder
- 20% for this week