Class hours: 9:40 – 2:05
Mr. Bohmann
wbohmann@ewsd.org
Week Three
Today’s Notes
- Today is an EHS A Day and CTE Red Day
- Sweatshirt Sizes – let’s get them in the books – we’ll start designs next week (probably)
- Emmit – picture retake… details
- Trying my best to keep up on grading
- Other news, your SD card is your friend. Don’t forget to review and delete!
9:40 Attendance
9:45 Photography Understanding ISO

The three main pillars of exposure are Aperture, Shutter Speed and ISO. Aperture and Shutter speed are physical mechanisms that allow you to control the light.
That means that when you take a picture there are three things that determine how light or how dark your image will be.
- Aperture – (how large or how narrow the aperture is will impact how much light passes through the lens (effect – blurred backgrounds and depth of field)
- Shutter Speed – (how fast or slow the shutter opens and closes – good for stopping or blurring action)
- ISO – the amount of light allowed to hit your camera’s sensor
These three things together are referred to as the Exposure Triangle
ISO measures the light gathering speed of film. Back in the old days old timey images were exposed for a long period of time using long shutter speeds. With digital cameras the sensor is …well… more sensitive so we can shoot at faster shutter speeds and increase light through ISO.
For the most part we have been shooting with Auto ISO. ISO records light levels across the sensor and charges each pixel with electrons to amplify the signal. ISO is simply how much amplification is applied. So if we need more light, we can increase the amplification.
This amplification comes with a cost though. The higher the levels, the noiser the image.
Shutter Speed
Aperture
ISO
That’s it! If you know these three, then you know how the fundamentals of photography work!
Why, When and How to increase or decrease the ISO…. – Let’s practice I’ve got some shooting stations set up.
Take picture with ISO at lowest to auto setting.
Enduring Questions to ponder?
- What happened with our shutter speeds at low ISO settings?
- Why would a tripod be useful at low ISO settings?
- Why were the images at high ISO so bright?
- What changes did you notice with the shutter speed at different settings? Why would the camera change the shutter?
- Nighttime photography, why would higher ISO be useful
- If you are photographing a subject that is moving or the light is changing what ISO setting would make your life easier?
- Can you change the max ISO setting in your camera?
10:35 Break

10:45 English with Ms. Yopp
11:35 Ms. Charron CTE Guidance
Mrs. Emmy Charron is your guidance counselor at CTE. She will be working with us throughout the year and is an excellent resource for you during your senior year.
Today we’ll explore the pathways towards continuing education after High School. What will you be doing next year?
Today’s Goal: Learn about where to look how to access resources, Get to know who can help you, and build confidence about the college planning process.
11:45 Long Exposure Practice (Depends on the time….)
If we don’t get to this, we will on Wednesday.
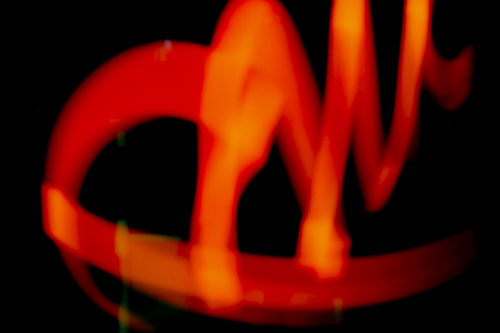
Low light means we need more light. So….
Small Aperture brings in more light!
but a small f stop means short depth of field
Adjusting ISO to higher number brings in more light!
but too high of ISO adds grain 🙁
Slow shutter speed brings in more light!
but chance of camera shake 🙁
Let’s practice some long exposure work in class with some light painting. We’ll shoot in Shutter Priority Mode.
12:15 Lunch
12:45 Selective Color – Manipulating Images Using Photoshop

A creative expression in Photography can be pushing the color of an object and desaturating the colors of other subjects in the image. This feature design element is great for exaggerating your main subject.
Let’s jump into Photoshop. Select an image that you took yesterday of a flower from the garden. If you need a photo, I have one in Public Folders / Cawd2 / Adobe / featuredElement.jpg
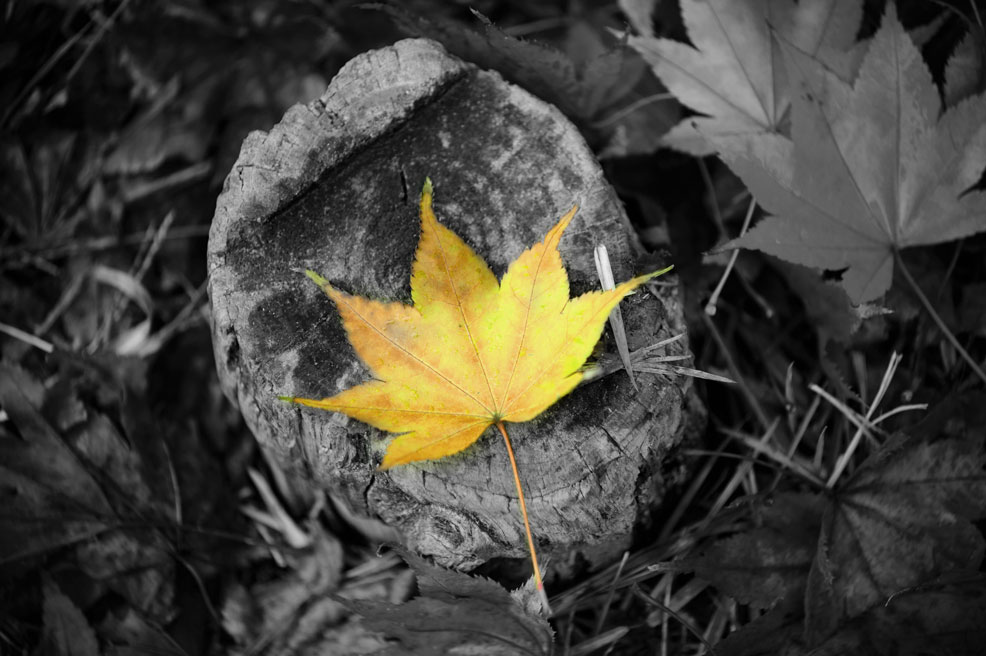
We’ll be using desaturation, quick selection tool a mask and several layers. There’s a number of ways to get this look.
white reveals and black conceals
So in other words, when you paint with white inside of a layer mask, you reveal- you show the contents of that layer.
If you paint with black, you conceal, – you hide the contents of that layer.
1:10 Break
1:20 20% Production Time & Guided Support
20%
Personal Logo – 2 digital versions for review (Thursday)
Photo Composition Assignment (Thursday Morning)