Class hours: 9:40 – 2:05
Mr. Bohmann
wbohmann@ewsd.org
Week Twenty Three
Today’s Notes
- Today is an EHS A Day
- Game day next Friday – be complete to participate
- You are on track if you have 3 of your 5 assets modeled
- You are on track if you have started your storyboard
- BFA-FX has an early dismissal day. Eric – early lunch as your bus leaves CTE at 11:50
- EHS classes begin at 12:25 today
- We may have visitors – but nothing confirmed yet
9:45 2D Playing with Mass & Other Principles of Animation

Key Terms
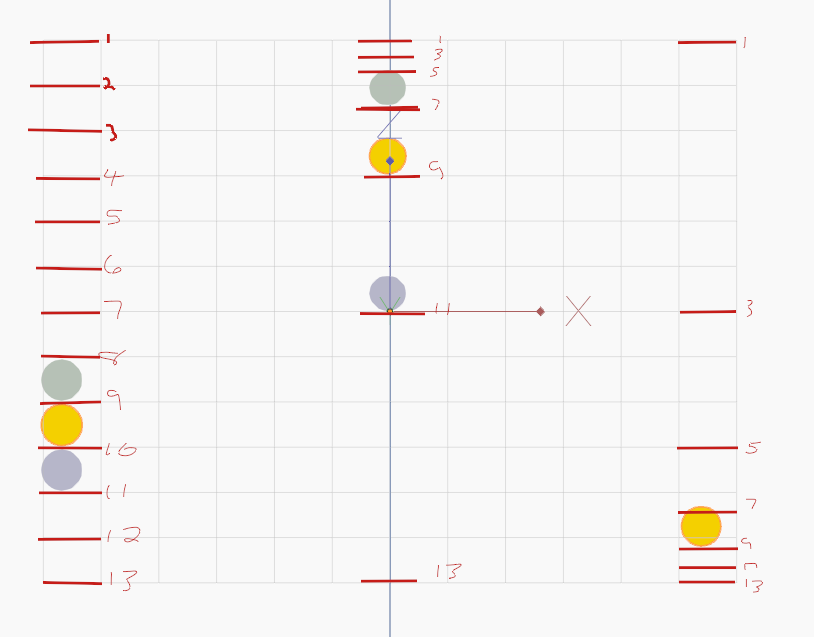
Pose to Pose – method used for creating key poses for characters and then inbetweening them in intermediate frames to make the character appear to move from one pose to the next. Example the start of the ball on frame 1 and the squash of the ball on frame 13. The artist then draws the stages of the ball in between the frames.
Straight Ahead – method that uses only the first key pose of a character, and then continues drawing the character to create the desired motion. This technique is creative but does not always produce accurate results. Example drawing a ball and changing the drawing each frame until you reach your desired outcome.
Easing – refers to the way the motion is the animation is framed. Linear, ease-in, easy-out are popular methods. For the ball animation, we ease out as the ball gains speed and momentum.
Staging – is where you direct the viewer’s attention, could be the background, scenery, location and set up of your main character(s)
Twelve Principles of Animation
- Squash and Stretch
- Anticipation
- Staging
- Straight Ahead or Post to Pose
- Follow Through and overlapping action
- Slow in and slow out (easing)
- Arcs
- Secondary Action
- Timing
- Exaggeration
- Solid Drawing (identifying your object’s mass)
- Appeal
Let’s tackle three projects. Set them up as scenes and then combine them using the Video Editor in Blender. Yesterday you made a ball bounce. What about other objects?
When creating a new scene – choose Full Copy, then delete what you need to delete. Rename your scene.
You are working with the grease pencil while in Blender. We’ll set up our projects in the 2D workspace.
- Scene #1 will consist of a brick falling from a building, so focus on Mass
- Scene #2 will focus on using squash and stretch. Making a water balloon
- Scene #3 will be of your choosing (maybe a dropped fish, microphone, glass) – what principles do you want to use?
When working in the Video Sequencer, make one extra blank scene. Add your other scenes in the sequencer. What about Audio? What About Titles – let’s do it.
Using the Blender Video Sequencer, organize the following scenes in one final .mp4
- Brick
- Water Balloon
- Your Choice
Bonus for Audio and Title Cards!
Finished projects will be rendered as 2DPractice_Scenes.mp4 (drop in the Google Classroom)
Have each scene play 3 times.
This project is due in one week – February 22nd. Besides modeling, it is your only assignment.
10:35 Break

10:45 Let’s build a new game – CAWD Rollerball

We’ll start from scratch with a new game. We’ll call it Cawd Rollerball. We could:
- collect coins
- make multiple platforms
- add obstacles
- add scoring or timing system
- add killbox
- add particle effects for when we collect something
- what else?
Let’s first get some player movement – this is a good starting point. We’ll start by defining some variables
and then look for input keys. Variable names are in the script below.
// we need to take the input from the arrow keys pressed by the player. By default in unity, the left and right arrow keys are labeled as "Horizontal" and the up and down arrow keys as "Vertical"

// we will define two variables where the value of each will be set "several times per frame" if the player presses the horizontalMovement (i.e. the left or right key) and/or the verticalMovement (i.e. the up or down key)

horizontalMovement = Input.GetAxis("Horizontal");
verticalMovement = Input.GetAxis("Vertical");
// since we are dealing with three dimensional space, we will need to define a 3D vector based on which the ball should move. As such, we define a Vector3 called MoveBall that takes three parameters of X,Y,Z

// movement on the X axis will be our horizontalMovement (i.e. the left or right key) and on the Z axis the verticalMovement (i.e. the up or down key). As we do not want to move the ball in the Y axis in the 3D space (i.e. up and down in the 3D space), the Y value will be set to 0

Vector3 moveBall = new Vector3(horizontalMovement,0,verticalMovement);

//lastly, we will need to access the physics component of our ball game object (i.e. the Rigidbody) and add a force to it based on the values of the vector we just defined. We will multiple this force value with our Speed variable to be able to control the Speed of the force as we wish.

rb.AddForce(moveBall * speed);
using System.Collections;
using System.Collections.Generic;
using UnityEngine;

public class ballmovement : MonoBehaviour
{
    //variables
    public float speed;
    private float horizontalMovement;
    private float verticalMovement;
    [SerializeField] private Rigidbody rb;


    // Update is called once per frame
    void Update()
    {
        horizontalMovement = Input.GetAxis("Horizontal");
        verticalMovement = Input.GetAxis("Vertical");
    }

    private void FixedUpdate()
    {
        Vector3 moveBall = new Vector3(horizontalMovement, 0, verticalMovement);
        rb.AddForce(moveBall * speed);
    }
}
Next Steps:
- Add a killbox and respawn point (refer to yesterday’s lesson)
- Add some materials to your platform
- Add an additional platform but with challenge to your level
- Make your player a prefab
- Add some walls to make the game easier
11:30 Modeling Time or 2D Animation
12:15 Lunch

12:45 Literacy in Practice

1:10 Break

1:20 20% Production Time & Guided Support
- PSA Asset Modeling – Due Monday, February 20th
- PSA Storyboard – Due Monday, February 20th
- 2D objects animation – Due Wednesday, Feb. 22nd
- 20% (if you are complete with other areas)