Class hours: 10:05 – 2:45
Mr. Bohmann | wbohmann@ewsd.org
10:05 Today’s Notes & Attendance
End of Week 34
Let me know the working title of your Game.
Share Trello boards with me. I will not grade yet, so no worries if all the details are not in there yet
Game Design Document is your first Game Project deliverable due (Tuesday)
10:10 Animation in Unity – Let’s revisit (because we did so little)

Once you have a set of animation images, creating the actual animation in Unity is very simple! First, you will add your images as individual sprite assets. This is done just like you have always added images to your earlier games. Create a “Sprites” folder inside the “Assets” area and then copy all of your images into that folder.
I have a sample folder of animated sprites for you. You can find it in public folders – called DogSprites.
- Let’s open a new scene in our Game Programming project – call it AnimationPractice.
- Add the DogSprites Folder to your sprites folder.
Let’s start with a walk cycle. Just select all of the animation images for (walk) and drag them onto the scene at the same time. Unity will automatically recognize that you want to create a Unity Animation. In Unity, an Animation is an asset that is saved in a file just like an image or script. Unity will prompt for an animation filename. Once saved, you will see two additional files – an Animator and Animation Controller.
Press play and see your dog walk – look at the inspector to see how the sprite renderer cycles the sprites and an animator is added to your game object.
Two Assets were added to your folder: An Animation and a Controller.
The first asset is called “Walk” and it appears as a Triangle. This is the actual Animation asset that holds all of the images.

The second asset, “Walk (1)”, appears as a set of 2 boxes connected by lines. This is an Animation Controller. An Animation Controller is used to change between different animations when the game is running. Right now we only have one Animation (“Walk”) in our controller, but you can add as many animations to your character as you would like. For example, we might want to add “Run”, “Jump” and “Idle” Animations to our GameObject, and then switch between them with our single Animation Controller.
Let’s organize all the animations in an Animations folder. Let’s also rename the animation controller to Dog Controller.
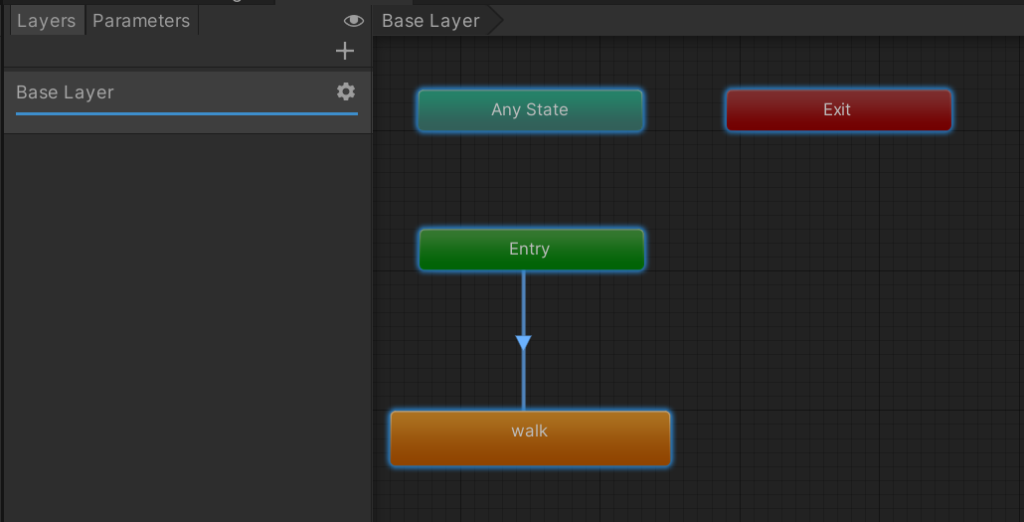
The Animation Controller is a tool that helps to manage multiple animations for one gameObject.
The Animator tab contains boxes that represent each of the animations in the controller. We can make transitions from one state to the next by right clicking on any of the boxes. I’ll demonstrate.

Remember that an Animation Controller is an asset that is linked to a GameObject through an Animator component. If you click on the GameObject in the Hierarchy, you can see the Animator component and the name of the Animation Controller.
Once all the transition arrows are created we can set up transitions so that when certain data conditions are met the condition changes.
Parameters
First, we need to define the data, and then we’ll add the logic to make transitions based on that data. To create some data for use in our transition logic, we will create a parameter or variable in the Animator tab. At the top of that tab is a section that says “Layers” and “Parameters”. Let’s choose parameters.

When you choose “Parameters”, you will notice that it simply shows that the “List is Empty”. Let’s fix that. We can click on the plus sign (+) and then choose our data type from the list. For now, we’ll just choose “Int” to make an integer parameter.
Just like any other variable, a parameter needs a name. For this example, we’ll give
our integer parameter the name “state”.
- Walk (state will be equal to 0)
- Run (state will be equal to 1)
- Jump (state will be equal to 2)
- Slide (we’ll create a trigger parameter) a trigger parameter is a animatio that plays one time without looping
Conditions
Once we have defined our animation parameters and how they will be used, we need to tell Unity about the plan! We do this in the Conditions area. Transition arrows use condition statements to decide when to move between states. Let’s set this up now.

The last thing to do is to write up some code to call our parameters. Let’s create a script called “DogScript”. You could also call it player script.

using System.Collections;
using System.Collections.Generic;
using UnityEngine;

public class DogScript : MonoBehaviour
{
    Animator myAnimation; //allows us to get access to the animator component


    void Start()
    {
        myAnimation = GetComponent<Animator>();  //initialize the variable
    }

    void Update()
    {
        int currentState = myAnimation.GetInteger("state");
        if (currentState == 0) // if currently walking
        {

        }

        if(Input.GetKey(KeyCode.W))  //check for "W" Key
        {
            myAnimation.SetInteger("state", 0);  //change to "Walk" state
        }
        else if (Input.GetKey(KeyCode.R))  //check for "R" Key
        {
            myAnimation.SetInteger("state", 1);  //check for "Run" state
        }
        else if (Input.GetKey(KeyCode.J))  //check for "J" Key
        {
            myAnimation.SetInteger("state", 2);  //check for "Jump" state
        }
        else if (Input.GetKey(KeyCode.S))  //check for "S" Key
        {
            myAnimation.SetTrigger("slide");  //trigger slide
        }
    }


}
10:50 Break

11:00 Game Studio Work Time

Start with a 5 minutes Scrum Meeting (group or individual)
- What are you working on?
- What will you complete today?
- What help do you need?
- Today is an official start to your game – develop a plan in mind on what you want to do
Update your Trello Boards (5 minutes) and / or add to the details of your Trello board.
Question? How will you know when your game is done? Ask yourself what the bare bones deliverables are. That way you know what you are working towards.
Don’t be surprised if I ask you this question.
I’d like to know the Working Title of your Game today. I will begin to populate our big whiteboard with all of the games.
12:25 – 12:55 Lunch

12:55 Independent Reading

1:20 Break

1:30 Passion Project Hour
2:40 Dailies

Dailies can be placed in the CAWD2 Dailies Folder on the CAWD2 Public Folders drive