Class hours: 10:05 – 2:45
Mr. Bohmann | wbohmann@ewsd.org
10:05 Today’s Notes & Attendance
- Today is a CTE Red Day
- Husson visiting tomorrow. We’ll leave the classroom at 10:05 right after attendance.
- Canned Goods – have some? – let’s support the CEHS food drive
10:15 HTML 5 Layouts – A Review of Semantic HTML
Websites often display content in multiple columns (like a magazine or newspaper).
HTML passes two related and distinct pieces of information to the user.
- The first is the visual presentation of information which tells your browser how to display the page
- The second is the semantic information. It conveys meaning in the document and what each elements purpose is. For example, an h1 conveys the largest heading and highest rank heading for that part of the page. Sighted users (those that have trouble seeing) use the semantic information to help them understand the page.
HTML5 offers several semantic elements that define different parts of a webpage:
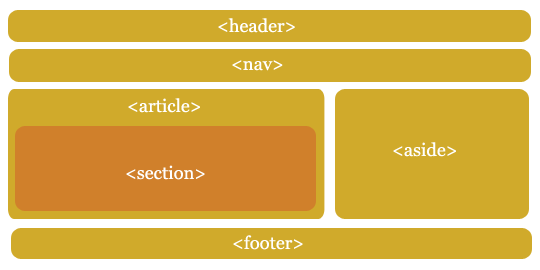
<header> Defines the header for a document or section, sometimes the nav will be in this area too
<nav> Defines a container for navigation links
<main> Defines the main content of the document. It should not contain content repeated across documents
<section> Defines a section in a document. Think of a thematic group. Like Chapters of a book.
<article> Defines an independent self-contained article. This could stand alone from the webpage.
<aside> Defines content aside from the main content (like a sidebar). Content is related or has an association.
<footer> Defines a footer for a document or section (usually at the bottom of the page)
Why the <section> and <article> are useful HTML Elements?
Before HTML5, web developers created a <div> to organize items on a webpage.
A <div> could have an ID or a class. ID’s can be used once. Classes can be used more than once. IDs and classes are helpful “handles” for CSS styling.
So, to minimize lots of divs and “divitis”, The <section> and <article> elements were added in HTML5. You don’t have to use them, however they are very useful.
The <section> element defines sections in a document, such as chapters, headers, footers, or any other sections of the document. A section is a generic section of a document.
Your resume could be divided into sections as an example (Objective, Education, Work Experience, References, Awards). Chapters of a story can be divided into sections.
Here is an example Vermont Road and Home of the sections element in use from a page I built years ago. Use the inspector to see how each part of the page is divided into sections and how the sections are set up as IDs that aid in navigation.
The <article> element is a specialized kind of <section> in that it is independent, self contained block of related content. Think of the article html tag as something independently reusable. Like a comment section, forum or blog post, interactive widget.
Web – Bonus – The Aside Element
The <aside> element can be used as a compliment to information found on a webpage, but perhaps the content might be better as a standalone option.
Let’s do one together and we’ll add some CSS for fun and practice (and review). First we’ll use some semantic HTML elements to structure the code.
Here’s some content for us to use – just fork my CodePen:
Mr. B. did you say “Extra fun” – Please, Please Mr. B. Show us the <details> and <summary> elements…
10:50 Break

11:00 English
11:50 About Me
At the end of the first semester you are going to have a very nice digital portfolio of your work. This portfolio will be a hand-coded website that represents you.
One of the pages on your website will be an About Me page. The About Me page is the most visited page on portfolio websites.
People find writing about themselves difficult. The goal is to quickly outline who you are and present a marketed version of yourself. I often think of it as an elevator pitch.
The key is not to go into too much detail, but cover enough ground so the visitor get a good idea of who you are.
- Introduce yourself
- Casual tone, friendly
- Add a few personal details
- Consider adding some awards and recognition
- Consider what professional experience you want to include
- Include a photo of yourself
- Have someone help you proofread and edit
Some examples (there are tons of them out there)
Example #1 excellent image and about me
Example #2 no image on bio but good about me
Example #3 creative image edit plus a short creative About Me
Start the first draft of your About Me page. A Google Doc template is available in Google Classroom.
Your First Draft is Due by Friday morning – so I can look it over and add some comments
You will also want to secure a high quality photo of yourself. Often this is a head shot. A professional photo is best. Good thing you all have cameras! Your photo is Due by Friday afternoon. We can always replace the photo, so no worries. We just need something to get started.
Here is a really nice set of headshot examples from one of the resources above
12:25 – 12:55 Lunch
12:55 Independent Reading

1:20 Break

1:30 Design Challenge

1:55 Production Time and Guided Support
2:40 Dailies

Dailies can be placed in the CAWD2 Dailies Folder on the CAWD2 Public Folders drive