Class Hours: 9:40 – 1:45
Mr. Cronin
Notes
- Happy Birthday MJ! Big day.
- Early release Wednesday! Callbacks:
- Isaiah to math at 12:50
- Anyone have late work to turn in? Great day to turn in any missing work! Especially those teams that didn’t turn in VR Showpiece Draft 1.
- Tomorrow after our article we will be setting up for Open House (Thursday night). The sooner we do it, the faster you get back to your Skills Production.
- If you can believe it I have to cross reference your names for our end of year Recognition Night in June.
10:05 Attendance and Article
10:10 VR Showpiece Production Time

Check to the Tuesday Dayplan for specifics.
We are in the middle third of production. We should see great leaps this week compared to last week.
Today is the “midpoint” of the project. By the end of today you should have:
- 2 image based projects on display (50% of deliverable)
- 2 sculptures on display (50% of deliverable)
- 1 rotating / moving (50% of deliverable)
If you don’t have this much in your VR Gallery by the end of the day today, you and your team have fallen behind and will have to use afternoons to get caught up.
10:50 Morning Break (10 minutes)

11:00 Study Guide

Once I see your passphrase move onto AM Production time for your First Multi-page site.
11:20 First Multi-page site

Check back to the Tuesday Dayplan for specifics.
11:55 Lunch

- No food in the room / eat in the Cafe.
- You are welcome to return to the room when you have finished eating and work / hang out.
12:25 Attendance and Article
12:30 Steve Jobs
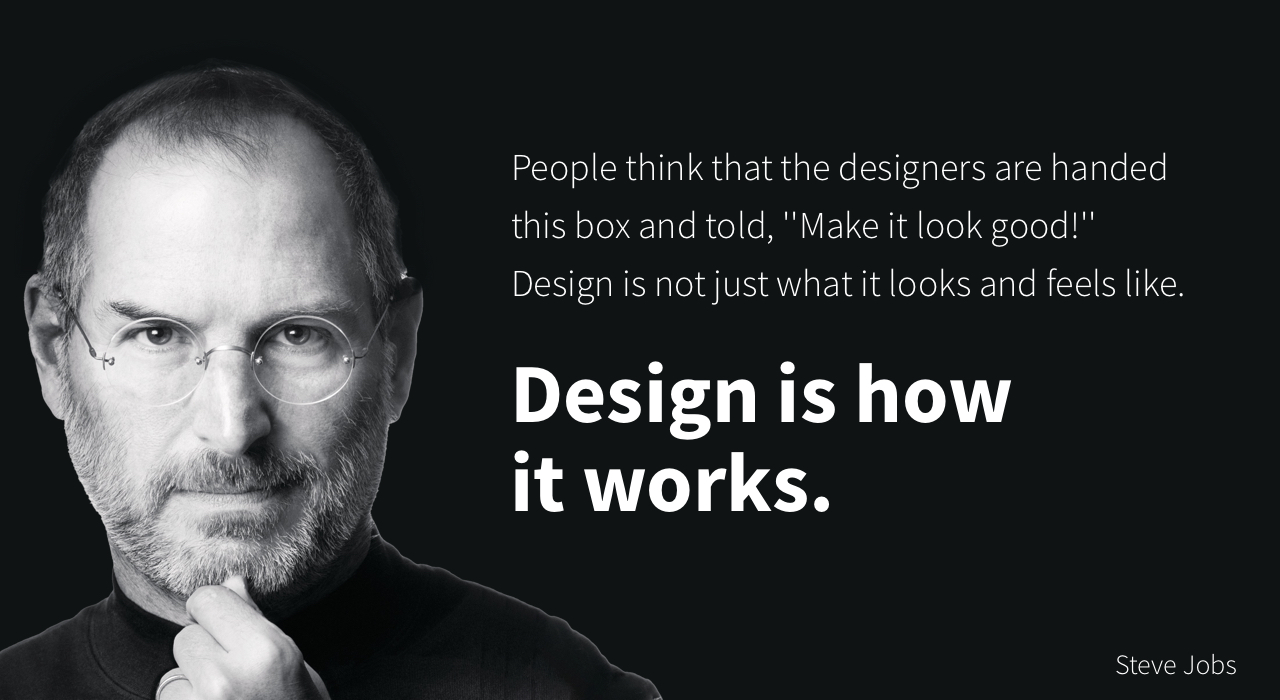
Based on more than forty interviews with Steve Jobs conducted over two years–as well as interviews with more than 100 family members, friends, adversaries, competitors, and colleagues–Walter Isaacson has written a riveting story of the roller-coaster life and searingly intense personality of a creative entrepreneur
Read along with Mr. Cronin. Improve literacy, word decoding, enjoy a nice story, and unplug from the world.
12:45 Afternoon Practice & Production

First Multi-page site
- folder called “multi”
VR Showpiece (draft week 2)
- lastNamelastNamelastNamelastName.mp4 (CD can turn in for team)
DH22: Glass of Water
- lastNameDH_22.jpg
Week 22 Agency (optional)
- lastNameAgency_1.jpg through lastNameAgency_3.jpg
Don’t forget that technically you have your Skills Deadline as well Friday at 12:55 – you happen to know this week because of our snow day last week…
1:20 Afternoon Break (10 minutes)
1:30 Afternoon Practice & Production
1:40 Dailies
1:45 Dismissal