Class Hours: 10:05 – 2:40
Mr. Bohmann | wbohmann@ewsd.org
10:05 Today’s Notes & Attendance
- NTHS set for Thursday, April 9th – begins at 6pm.
- This is Week 28!
- 2D Lip Sync Contest begins at 12:15pm Tomorrow. Bracket style playoff. Don’t miss your matchup!
- Hiring Fair in Library TODAY from 11:30-2:30 You are encouraged to attend – just let me know:
- Businesses and organizations who will be there include:
- * S.D. Ireland
- * PC Construction
- * AC Hathorne
- * Connor Contracting
- * Lewis Creek Builders
- * ECI (Engineers Construction Inc.)
- * Rivers Construction
- * VHV Company
- * Alliance Group Service LLC
- * Pinnacle Properties
- * Husky
- * Keurig
- * Autumn Harp
- * Beta Technologies
- * SBSigns
- * Home Instead
- * GlobalFoundries
- * ETS Staffing
- * City of Burlington
- * Town of Colchester
- * Essex Junction Park & Rec
- * EWSD IT
- * Maple Ridge
- * Northwestern Medical Center
- * ECHO Leahy Center (E-Team Internship)
- * Reach for the Stars
- * VocRehab/ Hireability
- * UNITED STATES NAVY
- * Army National Guard
- Businesses and organizations who will be there include:
10:10 NEW GAME ALERT – Let’s make a One Button Game together
and do some Flow Control….
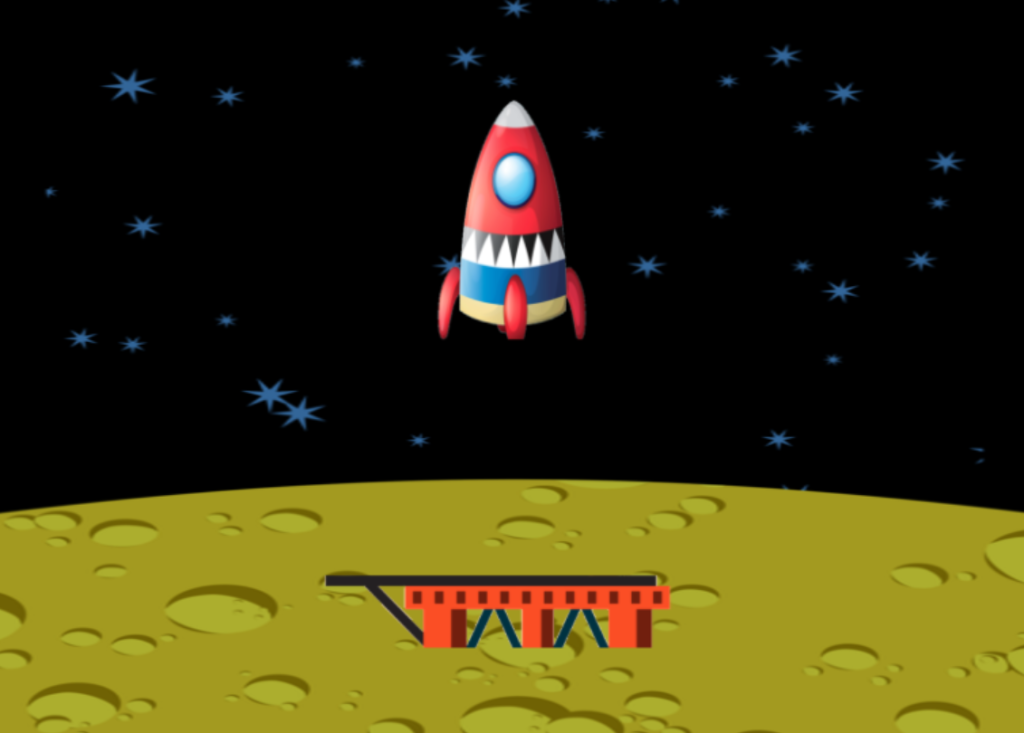
Let’s re-create a classic arcade game (LunarLander) and use our decision-making skills to script the game logic.
The object of the game is to keep the rocket from crashing into the landing platform. This game will be a single button game – we’ll use the up arrow key – that will provide thrust to the rocket. This is a basic game, we all start from somewhere.
Each time the rocket collides with the platform, we’ll program a message response that evaluates the condition of the landing/how hard the rocket touches down, like Crash or Smooth.
We are creating the core mechanics of the game. How would you scale this game? What would make it better or more interesting?
Go to the FunSprites folder and copy down the three sprites in the picture above or you can use your shuttle from the Challenge we did the yesterday but do add the moon and lander.
We’ll build this game in the 2D Playground folder we’ve been working in – name the Game Scene – Lunar Lander
Activity Details:
- Create a new scene – Lunar Lander
- Organize your gameObjects with layers (background / foreground
- Add Colliders to the Lander and Platform
- Add Physics to your Lunar Lander
- Add a canvas
- Create a Script Called LunarLander and add a LunerLander script to your rocket
- Add the Adding Unity TMPro library to your script
- Add a UI Text called MessageText and place at the top of the screen
- Create a public Text variable called messageText (remember you are using new libraries(refresher)
- Create an OnCollisionEnter2d function
Each GameObject has one or more components such as a Transform, Rigidbody2D, Collider2D, and so on. You will find that scripting logic will often need to access these components to handle game features. The Transform object is always present, and you know that you can get to Transform properties and functions simply by using the “transform.” variable as shown below.
transform.Translate(0, Time.deltaTime, 0);However, it’s not as easy to reach other components that are optional. Not all sprites have a Rigidbody2D or Collider2D object attached. To reach these optional components, you need to call the GetComponent() function like this:
Rigidbody2D rb = GetComponent<Rigidbody2D> ();
//What we are doing is creating a variable called "rb" and it is a RigidBody2D variable
For our LunarLander game, we want to apply an upward thrust to the sprite when an up arrow key is pressed. For realistic movement, we don’t simply want to call transform.Translate() to move the ship upwards. Instead, we want a force to gradually counteract gravity and, if held down long enough, begin moving the ship up the screen. These realistic simulations are handled for us by the Unity physics engine. So, we simply need to get the Rigidbody2D component and call AddForce() to apply a directional force on the sprite. Unity’s Documentation is really helpful. AddForce is a method build into Unity.
rb.AddForce (new Vector2 (0.0F, Time.deltaTime * 650.0F)); The AddForce() function takes a single parameter – a new Vector2 object that contains the forces to be applied in the X and Y directions. We simply want an upwards thrust, so we use 0 for the X and we use a value of 650 multiplied by Time.deltaTime for the Y values. Of course, we are multiplying by Time.deltaTime in order to make the force the same no matter how fast your computer calls the Update() method.
Let’s clean up our code (refactoring)… by creating a function
void Thrust()
 {
     Rigidbody2D rb = GetComponent<Rigidbody2D>();
     rb.AddForce (new Vector2 (0.0F, Time.deltaTime * 650.0F));
 }
Let’s look at the OnCollisionEnter2D() Function
This function will be run when the lander touches the platform. The platform has a BoxCollider2D. The first statement declares a local variable called relativeVelocity. This variable gets a number from the Collision2D object. The Collision2D object contains a property called relativeVelocity that gives us the relative X and Y speeds between the two objects involved in the collision.
void OnCollisionEnter2D(Collision2D platform)
{
   // get the speed at which the lander
   // has hit the platform
   float relativeVelocity = platform.relativeVelocity.magnitude;
   Debug.Log ("relativeVelocity = " + relativeVelocity);

    // ??? add an if/else chain here that will display
   // CRASH if relativeVelocity is greater than 5
   // or SAFE otherwise ???
}
Final Code for your Reference
How about Particles – we can do that – how about adding Custom Fonts – yeah, we can do that too
- Custom Fonts with Text Mesh Pro:
Windows/Font Asset Creator/Upload a TruType Font/ Generate Font Atlas - You can get fonts from DaFont
public ParticleSystem smoke;Quick Challenge – You have all of the necessary tools (examples) to complete the following challenge.
- Add a Lander Health Field or a Damage field on your UI canvas
- Create some variables at the class level:
- Create a Text type variable (we’ve done two of these already) to capture the damage or lander health
- Create an Int type variable for damage and initialize it to -1
- Add a nested If() statement inside of your Crash logic expression
- show damage text on your UI
- Show the lander health or damage score, which adds -1 each time you crash
- Add a custom font (go to DaFont) and add your TrueType Font to a Fonts folder in your Project
Bonus – Add a Game Over Message when your damage reaches -3
Super Bonus – reduce your damage by landing correctly.
10:50 Morning Break (10 minutes)

11:00 One Button Continued….
We’ll continue wherever we left off….
11:55 Lunch

12:25 A look at Publishing our Pinball Game
One of the strengths of the Unity game engine ease of publishing your games and the number of platforms you can publish to. The most important thing to know for successful publishing is that your game needs to be free of errors!
The default platform for publishing is Windows. So the first thing we’ll need to do is change the build type to Web. Then we’ll double check to make sure we have the Web module installed with the editor.
When it is time to build, we Select Build from the Build Profiles menu (found under the File menu). We’ll make a folder called Build so the final build has a home.
Play.unity.com is a location for your game builds. It is a perfect place to do testing and gather feedback on your game. Publishing can be public or private.
1:10 Afternoon Break
1:25 Speed Design

1:45 Independent Production & Guided Support
- 2D Lip Sync Due Tomorrow
- Environmental Design Project Run Through – April 13th
2:10 Dailies

2:15 Independent Reading

2:40 Dismissal