Class Hours: 10:05 – 2:40
Mr. Bohmann | wbohmann@ewsd.org
10:05 Today’s Notes & Attendance
- CTE Open House is Saturday, February 14th – know anybody?
- CTE Open House Workshops is Thursday, February 19th – know anybody?
- Don’t forget the VSAC Scholarships are due Feb. 11th – See Emmy Charron for details/questions
10:10 Working in the 12 Principles of Animation with Billy Bean
Using your character yesterday – we’ll look at several principles of animation and continue to build out a collection of animations using the Action Editor in Blender. Remember, the Action Editor is a specialized mode within the Dope Sheet editor for managing reusable animation sequences, called “Actions.”
I also like to work in the Animation workspace. Can you remember why? Let’s continue to build out the following animations while practicing several of the 12 principles of animation
- Idle Wobble
- Wobbly and Walk
- Look Left and Right
- Look Around and Shocked
- Anticipation & Jump
- Long Jump

Anticipation is the preparation for the main action. Remember our bird from last week. Just before the bird jumped, the bird squashed down and to build up energy.
Anticipation is the crouch before the big jump. You see this in video games all the time – just look for it. Squash, Stretch, rotate, twist are all forms of anticipation – and in the example above, it is rotation and deformation!
10:50 Morning Break (10 minutes)

11:00 Working with our rig and review
Yesterday, we carefully set up our bones and used good naming conventions.
- Deforming Bones are ones that are connected to the mesh and have parents
- Non Deforming Bones included our IK controllers and Poles and do not have parents
- IK and Pole target controllers do not deform
I like to name things this way:
- shoulder.L
- footIK.L
A bone’s head and tail closely aligned with loop cuts deforms best.
We used Symmetrize to copy the information from one side of our rig to the other.
Inverse Kinematics – the last bone controls the ones above in hierarchy. Setting up various controls and looking at how to use the controls to move and animate your project.
Let’s spend 5 or so minutes to create some simple materials for your character. You can find a color palette or choose some colors that are pleasing. Before I begin, I am going to apply my mirror modifier that we used during rigging.
When doing materials, I am going to add them in Edit Mode and use L for linked.
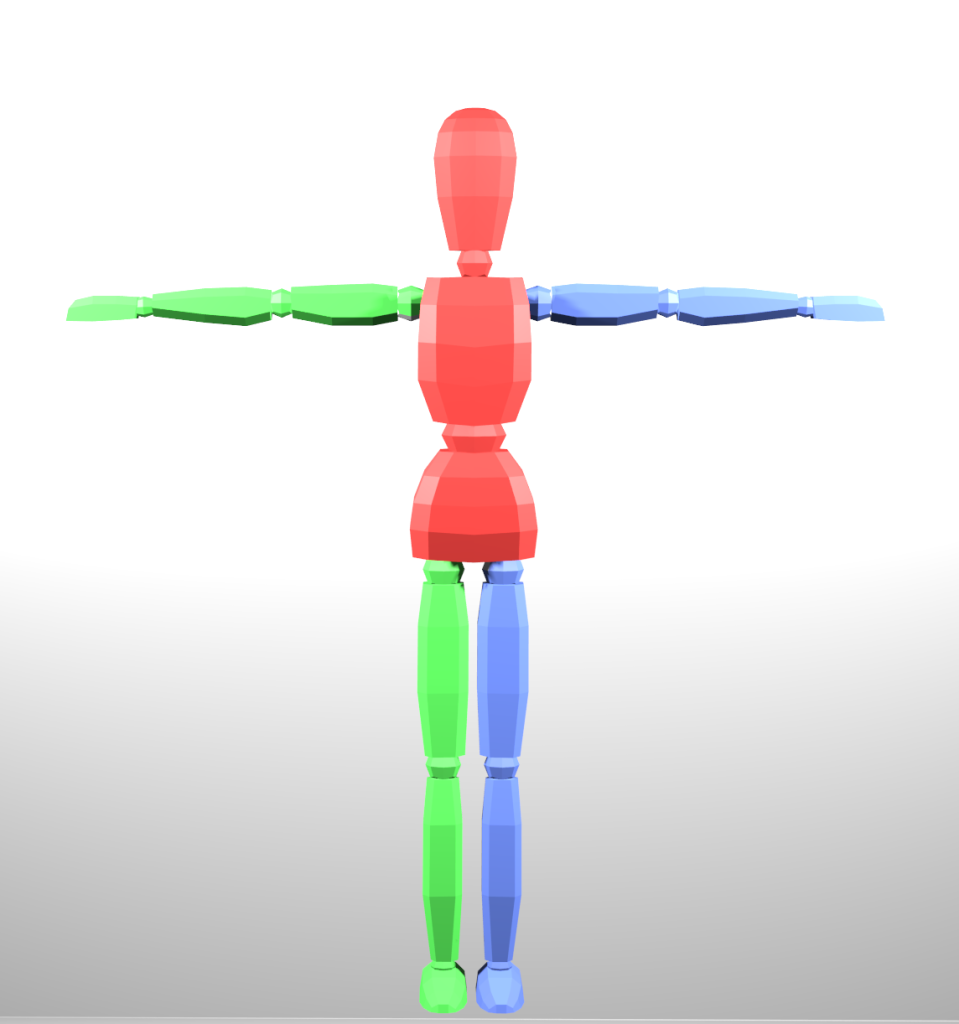
Additionally – consider coloring the left and the right side different with the body as the third color. Feel free to use the same colors you see in the image below or something similar in that the left and right are matching colors (respectively). This will make the walk cycle easier.
A viewport render ProTip – turn off your gizmos and overlays, to make things look a little better.
We added some color to our model so we can see the right and left sides of our character. In order for this to work, you need to have completed all of your rigging. Test to make sure everything is in good shape.
A Pose library really speeds up animation. Practice adding some poses in the pose libraries. When creating a new pose, remember to select all of the bones! Use your camera to store a nice looking pose.
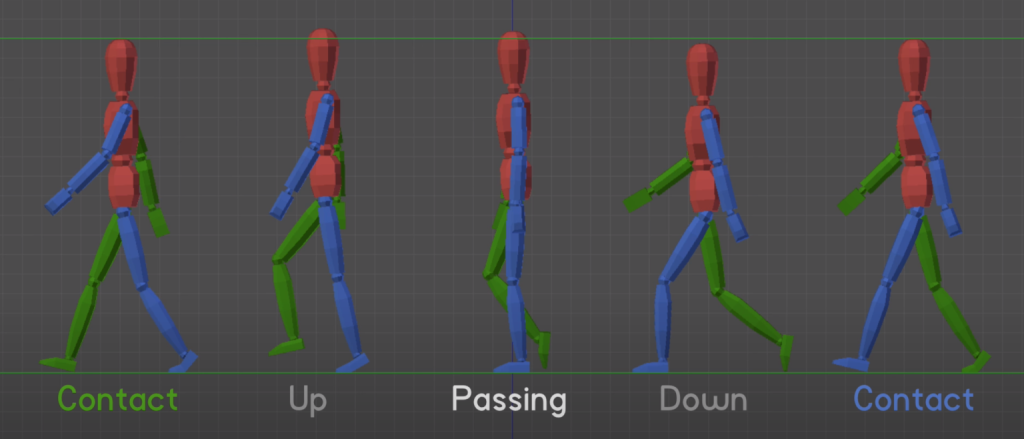
We only need to set up 4 Poses for the Walk Cycle to store in our Asset Library.
The Walk will be animated on the 3s!
That means in the image above working from right to left!!!!:
- Contact (blue) on 1
- Down on 4
- Passing on 7
- Up on Ten
- Contact (green) on 13
11:55 Lunch

12:25 Animation Cycles Continued
A quick review from earlier today (and yesterday)
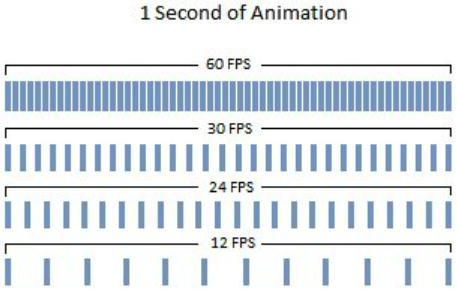
Keyframing is a fundamental skill in animation. To make a sequence have motion, objects move through frames – 24 frames by traditional animation standards all the way up to 60 fps (frames per second) for multimedia presentations. Most modern animations are 60 FPS.
Points of action, rise, fall, speed, direction all happen between the keyframes. A keyframe is a location on a timeline which marks the beginning or end of a transition.
Walking: Earlier today we did a nice confident walk on the 3s. If you want to slow your character down, consider changing to 4s or 6s. You might have to adjust your poses accordingly.
Running: animated on the 1s at 24 fps for a fast run cycle that cycled twice. If you want to slow your runner down, animate your keyframes on the 2’s and you will get one complete cycle (right and left)
Want to see the difference between 15fps and 60fps – Check this out
Let’s go for a run….
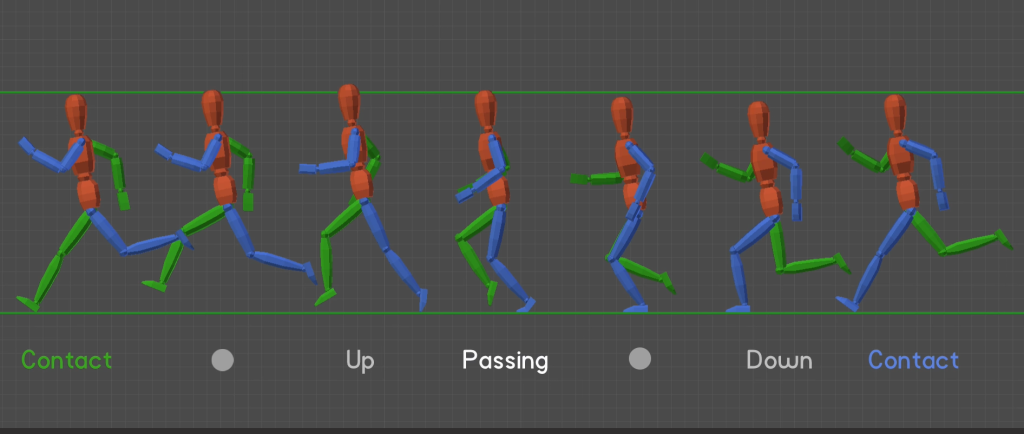
Just like the walk cycle we’ll start and end our animation with the contact pose.
We’ll only need six frames and we’ll animate on the 1’s! Our runner will be fast!
Assignment: Moods Project – Due February 11th (next Wednesday for viewing!)
Now that we’ve got a walk and run cycle in our Asset Browser, it’s time to add some other actions.
Pick Three
- Mopey & Sad
- Limp
- Sneaky
- Strut
- Waddle
- Prowl
- Other
Due: Wednesday, February 11th. We’ll watch them in class – so have it ready for Wednesday
- Set Up lighting, camera and some simple staging. Each pose should animate for 5 seconds.
- Render to a final .mp4 for a total of 15 seconds.
Filename: Moods_Demonstration.mp4
Blender ProTip, save each mood as a new scene. Then use the video editor to pull your scenes together.
1:10 Afternoon Break
1:25 Speed Design

1:45 Independent Production & Guided Support
- Rigged Character Poses – Due Friday
- Figure out Animation / Game for Skills and partnerships , Due Thursday
- Moods Demonstration – Wednesday, February 11th
2:10 Dailies

2:15 Independent Reading

2:40 Dismissal