Class hours: 10:05 – 2:45
Mr. Bohmann | wbohmann@ewsd.org
10:05 Today’s Notes & Attendance
- Design Competition in Game and Animation kicks off tomorrow – What discipline? Have a team?
- No callbacks to speak of
- VSAC Scholarships / Grants – Vermont Student Assistance Corporation has an extensive list of scholarships and grants that you should apply for. For example – most of your towns have a Rotary Club (Business Club) – they give out money to college bound seniors every year. (Each of my daughters won the Williston one a couple years ago). It’s free money, you just have to put in a little work with an application. Deadlines for the VSAC Scholarship Applications are February 11th.
10:10 Cameras – Multiple Cameras / Camera Rigs and Markers with Cameras
The Camera after-all is the viewport to any model, render and animation you create. Over the next couple of weeks, we wil explore more features of the camera and many of the settings you can configure.
One skill set you should really have is setting up a basic camera rig. Here is a basic and versatile way to set up a camera rig for tracking shots in Blender. We will be using an empty and parenting the camera to an empty and then having that empty follow a path using object constraints. There are so many reasons to work your camera this way – let’s think of some…
We’ll Need:
- Path (we can use a circle)
- Mesh (we can use a cube or Monkey or anything really)
- Camera
- Empty
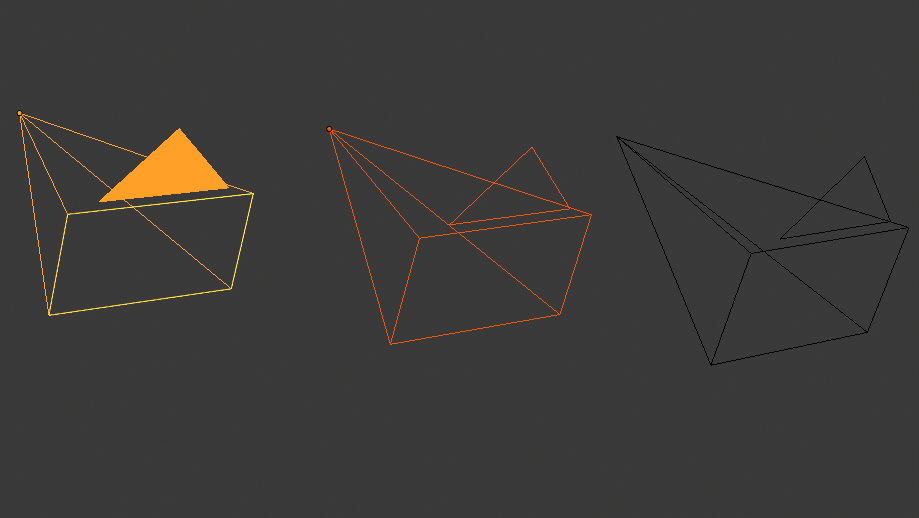
For our second camera activity let’s consider how we might handle multiple cameras. You could set up 2, 3 or 4 cameras and render each animation from each camera, or you can step up your camera game and use the Bind to Camera by creating Markers in your timeline. The keystroke you’ll need to remember is CTRL+B.
Challenge: The “Urban Chase”: Create a low-poly city street. Have a vehicle zip through traffic or down an alleyway with a camera on the top of the car and several on the street following the action.
10:50 Break

11:00 Animation Principle #3 – Staging
The third principle of animation is Staging. Staging is the process of setting up a scene by carefully placing characters, objects, and the background elements within the camera frame to direct the viewer’s attention help explain the story’s mood, action, and character reactions through their positioning, poses, and camera angles. We practiced this concept when we created our bird swing (in a tree) last week.
We’ve practiced many of the 12 principles already – they work together!
Twelve Principles of Animation
- Squash and Stretch – goal: keep volume the same
- Anticipation – goal: give viewer clue of what is happening next
- Staging – goal: give animation a context and focus attention of viewer
- Straight Ahead or Post to Pose – goal: depends on animation & frame rates SA can look more organic, P-to-Pose can have better continuity
- Follow Through and overlapping action – goal: adds realism to animation and follows rule of inertia
- Slow in and slow out (easing) goal: makes the animation have speed – acceleration or deceleration
- Arcs – goal: objects and character look more organic in movement
- Secondary Action – goal: action that support the main action think foot tap while playing guitar
- *Timing – goal: to give viewers chance to perceive what is happening in the animation
- Exaggeration – goal: show expression and have bigger impact on viewer
- Solid Drawing (identifying your object’s mass) goal: provides volume and weight
- Appeal – goal: – to make illustrations look likeable and interesting
Staging can also include props, etc… what we’ve referred to as Mise en Scene.
First – Let’s set up a jump animation. We’ll use our rigged character from yesterday.
Blocking – is the concept of laying out the main extreme keyframes.
With a jump animation, there are 5 jump poses:
Anticipation, Jump, Mid Air, Fall and Recovery. On either end you will find a neutral pose.
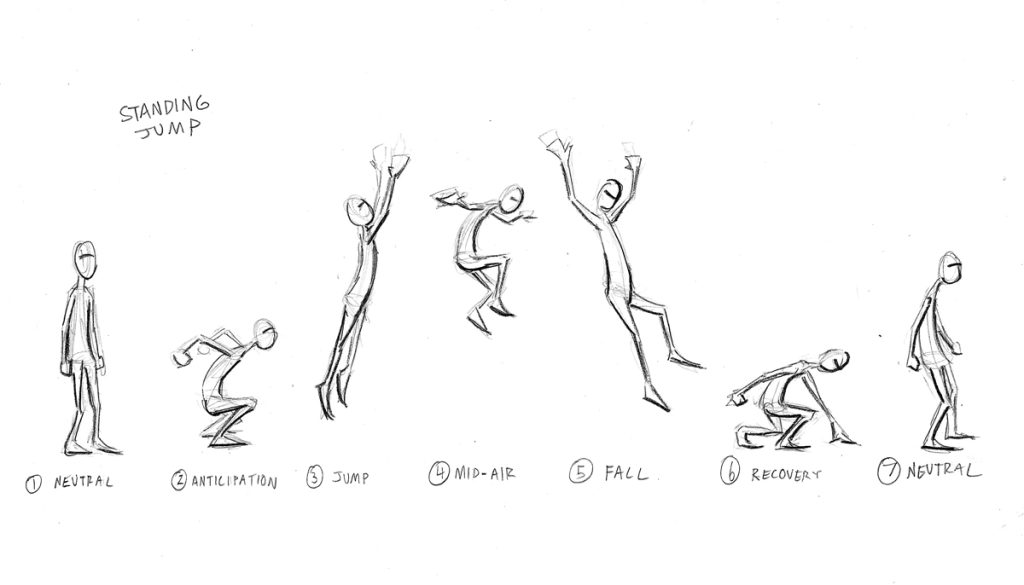
Getting Started – Set the Extreme Poses
- The first step is to block our your main poses. Starting with the neutral pose for you character. I’d suggest you save this pose in your pose library, along with your other poses.
- Create neutral pose on Frame 1.
- Move your timeline to Frame 9/10 and set up the Anticipation pose.
- Set up all the other main poses every ten frames. ProTip, it’s a good idea to adjust your timing between poses after you have everything laid out. More time is generally given to anticipation and recovery poses while the jump and fall animations may be faster.
- You then can go back and adjust the in betweens/breakdowns
Squash & Stretch, Anticipation, Overlapping Action (drag) all make for more fun and enjoyable animations to watch.
Think about your render settings, camera angles carefully.
Assignment– Staging
Now that you have your jump animation – build the scene around it. Start with an establishing shot to set the scene and build excitement.
Use multiple cameras to capture the action
Set the scene – is your character jumping a canyon, a crater on the moon, a curb, from a dock to a boat…
Dont’ forget materials and lighting – fill your viewport with good visual scenery to set the stage
Rendering and Exporting:
- Render the jump animation as a video file (e.g., MP4). Use EEVEE
- Duration: 5 seconds (24 frames per second)
- Filename: staging_a_jump_Lastname.mp4
Assignment is due: Wednesday,February 11th
This is a good exercise to showcase weight, overlapping action (drag) squash and stretch and anticipation. During the jump, we want to be able to see the character and the key poses.
11:35 Lunch

12:05 Afternoon Production / Practice and Guided Support
- Rigged Character Poses – Due Friday
- Moods Demonstration – Wednesday, February 11th
- Staging – Wednesday, February 11th
1:00 Afternoon Break (15 minutes)
1:15 Dailies

1:20 Independent Reading
